Why Press-On Nails Look Fake — and How Fit Changes the Look
Before blaming the design, check width, cuticle alignment, curve, length, and sidewall shaping. Better fit often makes press-ons look more natural.
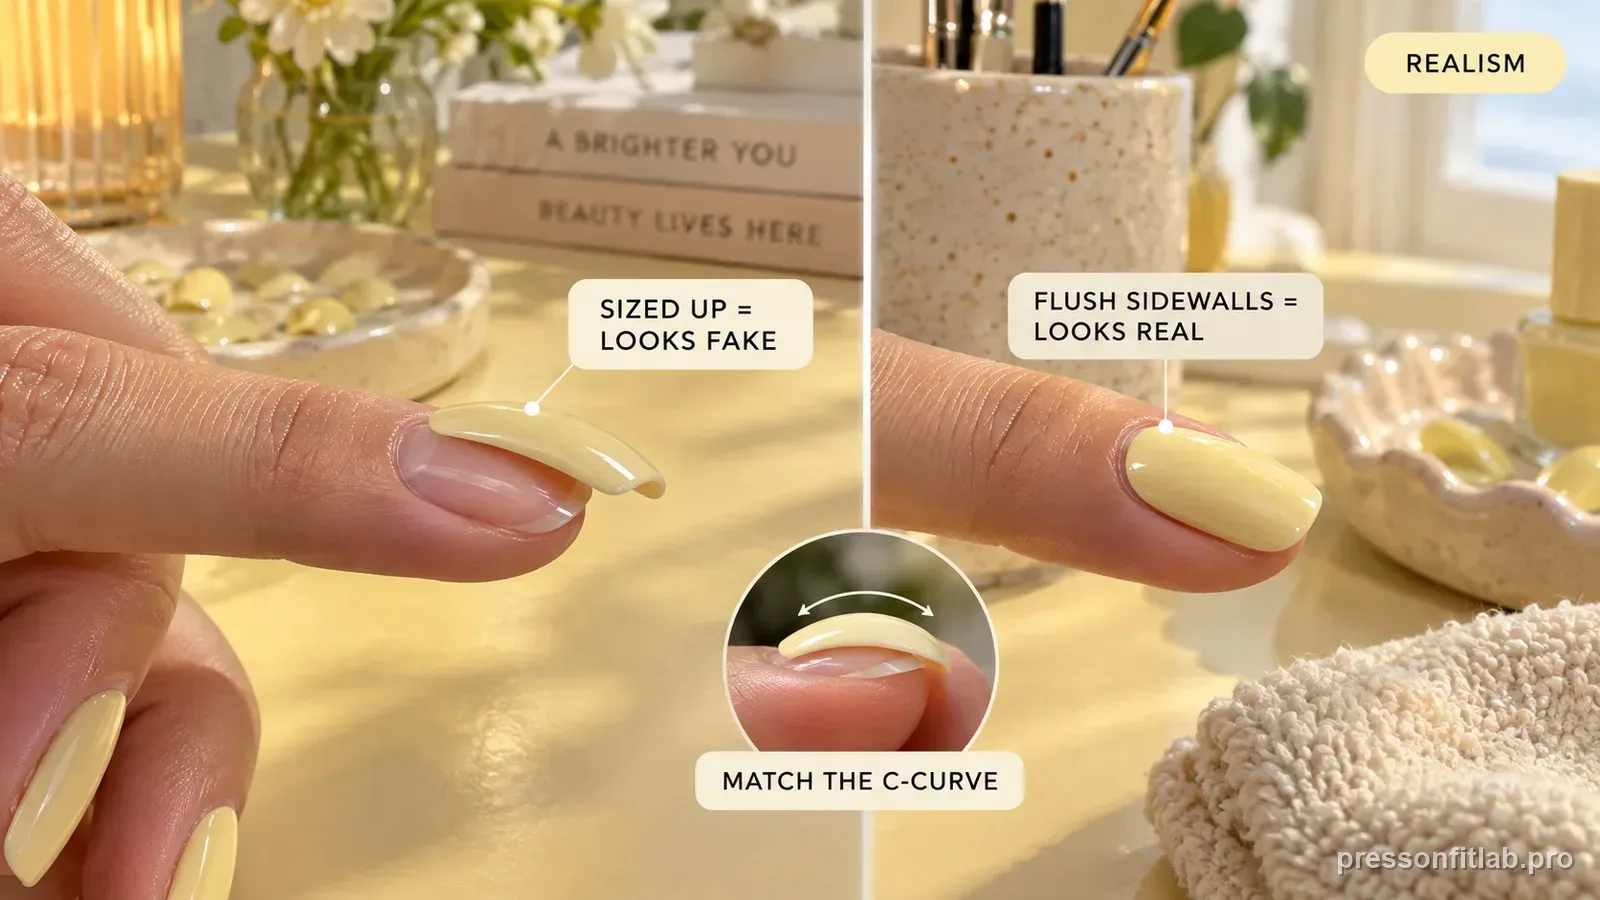
Press-ons often look “fake” when the base is too wide or narrow, the cuticle edge sits too far away, the curve creates visible gaps, or the length is out of proportion for the nail bed. Natural-looking results start with fit rather than color.
Check these first
- ✓ Cuticle edge follows your natural line.
- ✓ No exposed side strips.
- ✓ No skin overlap.
- ✓ Length suits nail-bed proportions.
The base is more noticeable than the artwork
People often focus on polish color or shine, but the eye notices the attachment point quickly. A press-on that starts too far from the cuticle or overlaps skin announces itself before the design matters.
Customizing the base shape can create a bigger visual improvement than changing the finish.
Width should disappear into the sidewalls
Too-small tips reveal natural nail at the sides; oversized tips sit on skin and look bulky. The correct width visually continues the natural nail plate. When you are between sizes, dry-fit the larger candidate and refine only the artificial edge if the material or manufacturer directions allow filing.
Curve controls the profile
A high-curve tip on a flat nail can look dome-like from the side and may leave gaps. A too-flat tip on a curved nail can appear spread out or fail to contact the center correctly.
Check the profile before glue so you are not trying to disguise a structural mismatch.
Length should match your goal and hand use
Very long tips can be intentionally dramatic, but if your goal is a natural manicure, a shorter free edge often looks more proportional and is easier to wear.
Use shape and length as style choices after the fit is solved.
Audit the silhouette from three views
Check the manicure from above, from the side, and from the free edge. From above, look for exposed natural nail or skin overlap. From the side, look for an unnecessarily tall dome or a cuticle edge sitting high. From the free edge, check whether the shell curve looks compatible with the natural nail.
Changing the design cannot correct those geometric clues. Once the fit is right, then length, color, gloss, and shape become the styling decisions that influence whether the set looks subtle or intentionally dramatic.
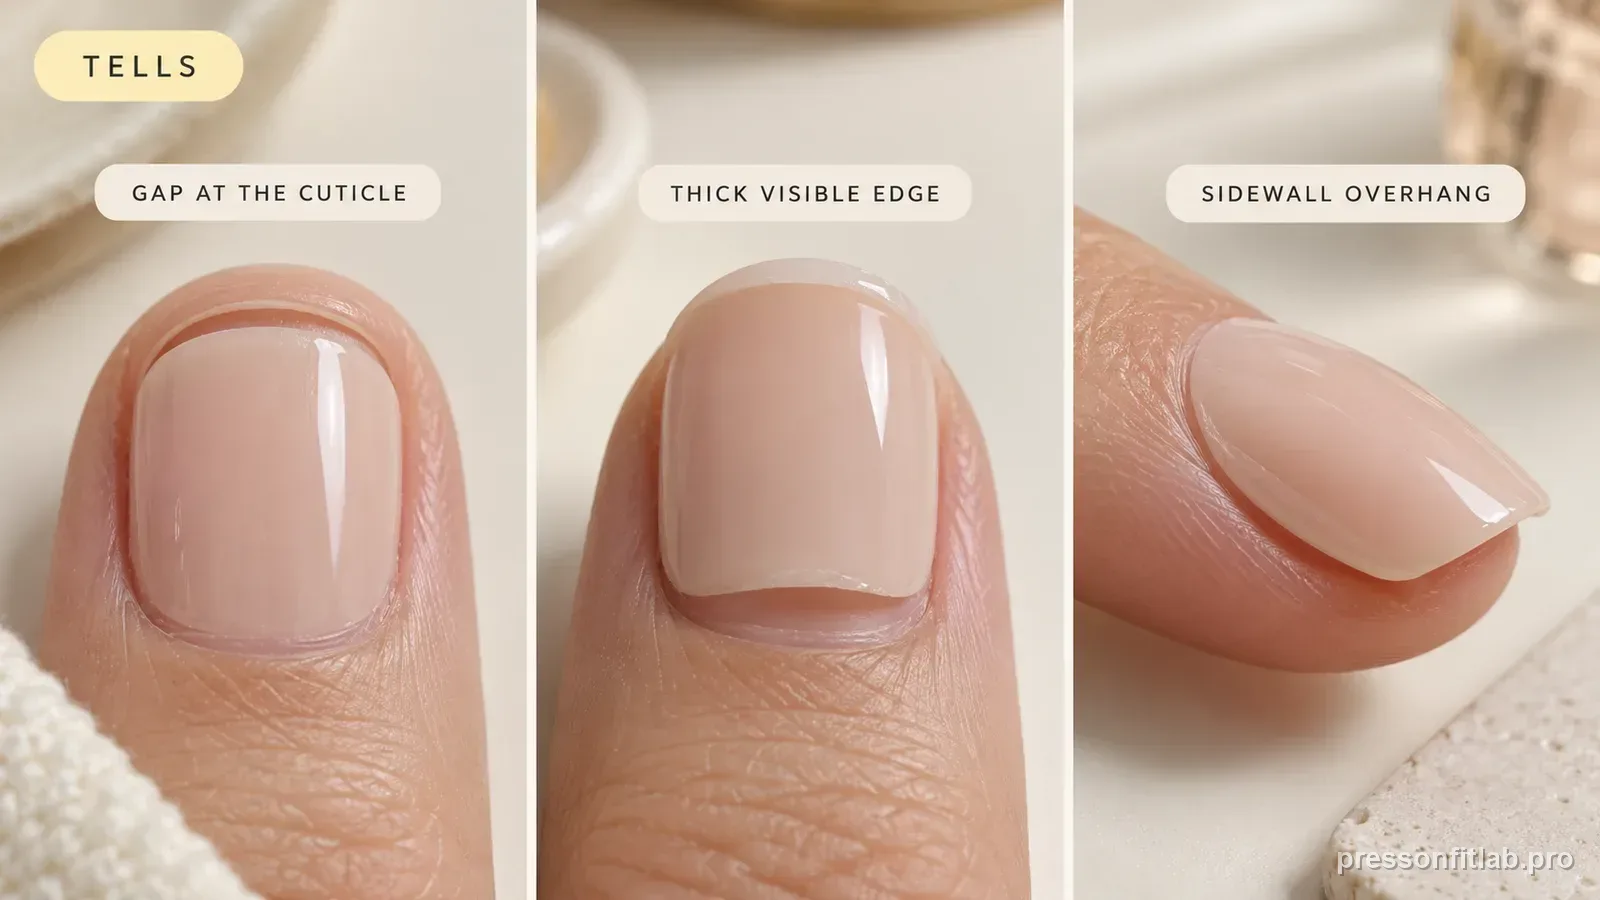
Use fit corrections before buying a new design
A new color or trend can distract from the same underlying geometry. If multiple sets look bulky for the same reason, compare width, curve, cuticle placement, and free-edge length before assuming the brand aesthetic is the problem. Solving one repeatable fit issue can make many different designs look more natural without requiring a new product category.
Diagnostic table
| What you see | What it suggests | Next check |
|---|---|---|
| Visible natural nail at sides | Tip is too narrow | Try a physically wider candidate or use a set with broader coverage options. |
| Press-on sits on skin | Tip is too wide/base too large | Choose a better size or refine only the artificial edge when the material allows it. |
| Base is far from cuticle | Placement or cuticle-shape mismatch | Move closer on nail plate or shape the base to match. |
| Tall dome from profile | Curve is too strong for the nail | Compare a lower-profile tip. |
| Length overwhelms short nail bed | Proportion is the issue | Try a shorter version of the same design. |
A controlled test plan
- 1
Judge the unglued set in three views: straight down, free edge, and side profile.
- 2
Correct width first; exposed nail or skin overlap is hard to disguise with polish.
- 3
If the size is otherwise right, adjust the artificial base only when the tip material is intended to be filed; otherwise compare a closer base shape.
- 4
Compare a shorter length if the base fit is good but the overall look still feels bulky.
- 5
Take a close photo in daylight; fit errors are often easier to see in a still image than while moving the hand.
What not to do
- Trying to hide poor sidewall fit with darker polish.
- Pushing a too-wide base underneath cuticle skin.
- Over-filing the entire nail just to make the cuticle edge slimmer.
- Assuming glossy finish is the reason a structurally mismatched tip looks artificial.
Worked troubleshooting example
Example: a set looks bulky from the side even though the color and shape suit your hands. From above, the thumbs also extend slightly onto skin at the sidewalls, and the cuticle edges sit a little high.
You compare a better-fitting width and a lower-profile shape before application. The new tips sit closer to the natural nail, the base follows the cuticle arc more closely, and less sidewall material is visible. The manicure looks more integrated without changing the design at all.
If the tip fit were already correct, you would then examine length, finish, and cuticle placement. 'Looks fake' is a visual symptom, so it helps to separate geometric fit from style preferences instead of treating the whole set as one problem.
Field notes
The eye reads the attachment point first. When the base follows the natural cuticle line, the sidewalls disappear into the nail boundary, and the profile is compatible, even a bold design can look intentionally integrated.
“Natural-looking” is not the same as short or nude. A dramatic press-on can still look well fitted. The useful question is whether the artificial nail appears to continue the geometry of your natural nail rather than sitting on top of it.
Frequently asked questions
How do I make press-ons look less fake?
Prioritize correct width, close cuticle placement on the nail plate, compatible curve, and a proportionate length.
Should I file the cuticle edge?
A small artificial-edge adjustment can help a close match when the tip material or manufacturer directions allow filing. Do not cut or file living skin.
Does matte look more natural than glossy?
Finish is a style preference; fit usually has a larger effect on whether the set looks integrated with the natural nail.
Sources checked
Sources below are page-specific. We prioritize manufacturer directions for product-specific steps and use medical or dermatology guidance when a safety question requires it. Always follow the instructions for the exact adhesive or set you own.