How Do Press-Ons Fit Over an Acrylic or Gel Overlay?
Diagnose press-on fit when the bonding surface is a rigid enhancement with its own apex, curve, width, and lifting risk.
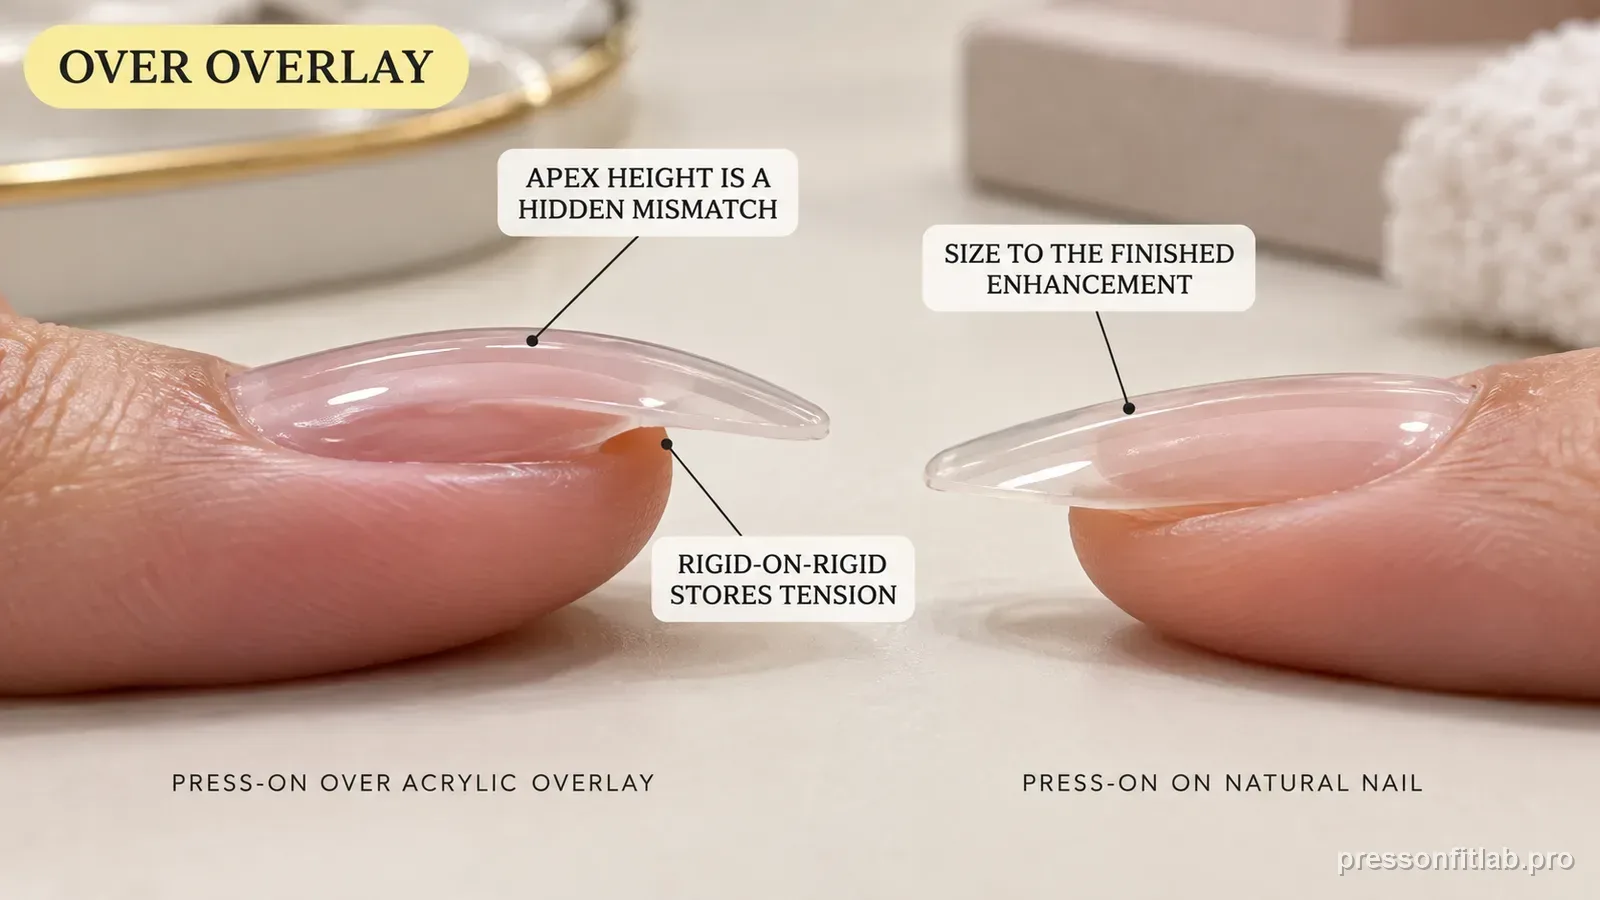
A press-on over acrylic or structured gel must match the enhancement you actually have, not the natural nail hidden beneath it. The overlay can add apex height, width, rigidity, and curvature, so old size records may no longer work. Apply only over a sound, fully attached enhancement and diagnose which layer fails if the assembly releases.
Check these first
- ✓ Is the underlying enhancement completely attached with no lift?
- ✓ Has the overlay added apex height that makes the shell rock?
- ✓ Did sidewall width change compared with the bare nail?
- ✓ Is the shell being squeezed to match a rigid curve?
- ✓ If it fails, can you identify whether the press-on or underlying enhancement released?
Size to the finished enhancement
The press-on contacts acrylic or gel, not the hidden bare nail. Re-measure and dry-fit all ten nails from the overlay’s actual sidewall span and curvature.
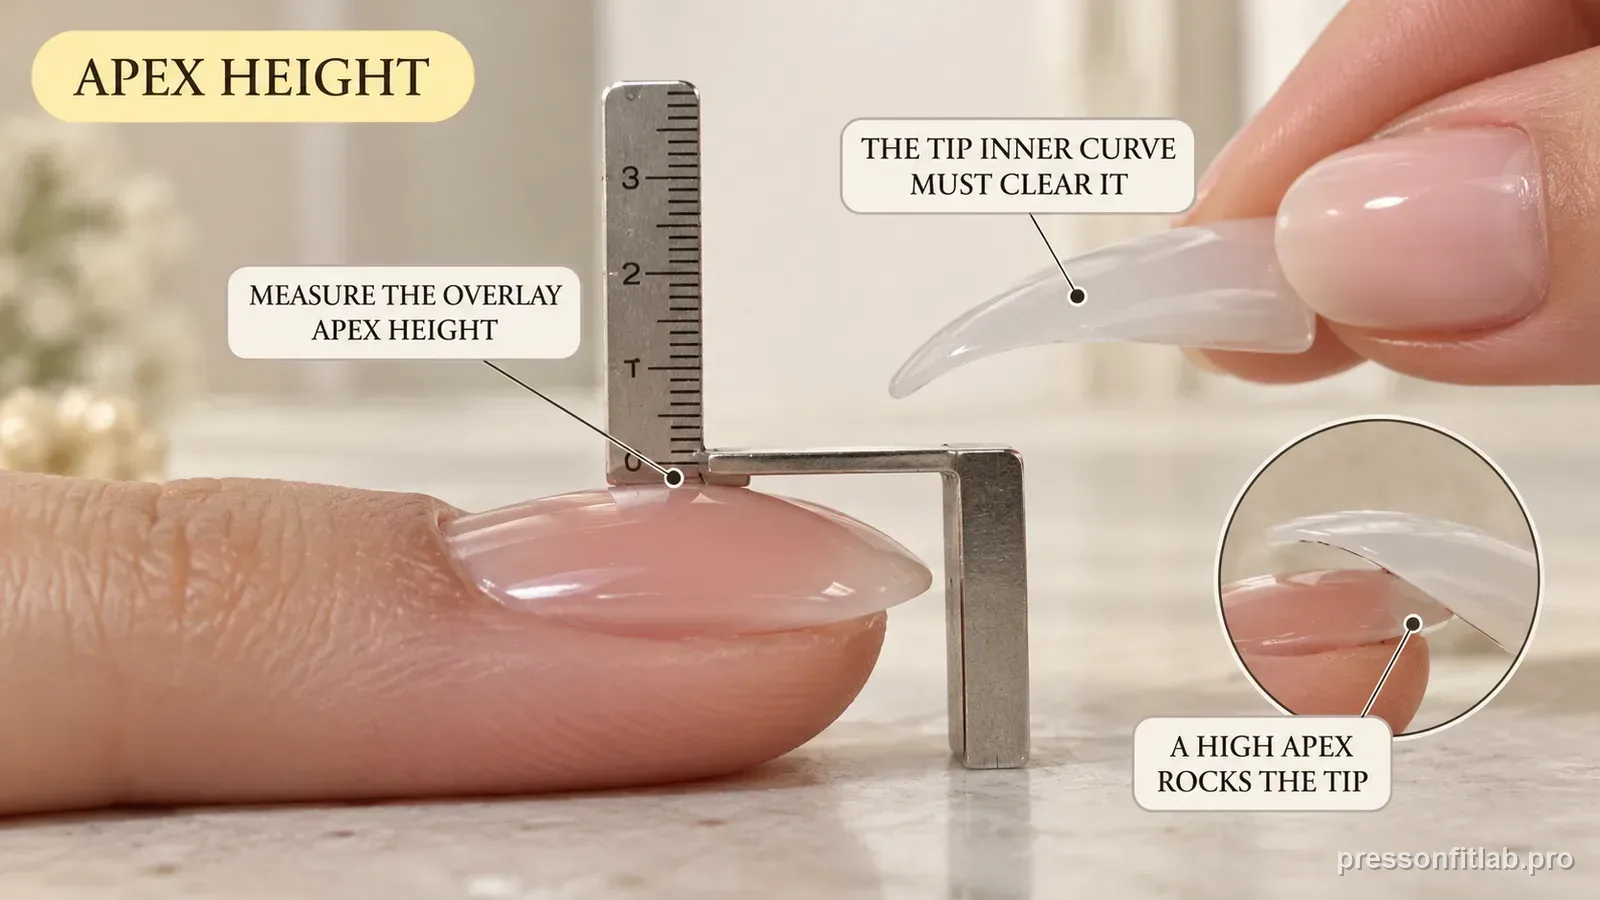
An overlay creates a new three-dimensional substrate. Professional gel instructions explicitly build and refine an apex, so a press-on that matched the unenhanced nail may now touch only at that apex. Check contact using reflected light: a continuous close interface looks different from a central contact spot surrounded by shadowed voids.
Underlying lifting makes the whole stack unreliable
A press-on can bond strongly to a piece of acrylic or gel that is itself lifting from the natural nail. Do not conceal pre-existing lift, cracks, unexplained color, or pain under another shell.
Existing overlay lift is a hard stop because a new press-on would hide the failed interface and can trap moisture. Look particularly around the cuticle and sidewalls where old enhancement lifting often begins. If the overlay clicks, flexes independently, or shows a visible air line, service that enhancement before adding another shell.
Surface preparation is system-dependent
Professional enhancement systems use specific filing, cleansing, and bonding steps. If you deliberately add a press-on layer, preserve the enhancement and avoid filing through it into the natural nail just to create grip.
Surface prep should stop at the enhancement. The aim is not to ‘reach fresh natural nail’ through acrylic or gel. Over-filing can thin the underlying structure, alter the apex, and produce a geometry different from the one you dry-fitted. If compatibility requires substantial reshaping, remove or rebalance the old enhancement instead.
Rigid-on-rigid stacks store more tension
An acrylic or hard-gel enhancement flexes differently from bare natural nail. If the press-on must be squeezed downward to match it, adhesive is being asked to hold stored mechanical tension.
Layered failure analysis is especially powerful here. Press-on plus adhesive coming off while the overlay stays intact suggests the top interface. Overlay material attached to the released press-on suggests failure below. A crack through both systems after an impact suggests the load exceeded structure rather than a simple adhesion issue.
Failure debris identifies the weak layer
If the press-on releases while the overlay stays perfect, inspect the upper interface. If gel or acrylic comes away with the shell, the deeper enhancement failed and stronger press-on glue is the wrong fix.
Rigid-on-rigid pressure should be treated conservatively. If an acrylic overlay is high-arched and the press-on shell is shallow, pressing it flat stores stress in both layers. A deeper, more flexible shell that sits naturally is preferable to using prolonged hand pressure as a substitute for compatible contour.
Diagnostic table
| What you see | What it suggests | Next check |
|---|---|---|
| Press-on rocks over overlay apex | Shell interior too shallow | Choose a deeper or more flexible shell |
| Old size now pinches | Overlay changed width/curve | Re-size from finished enhancement |
| Press-on comes off with gel/acrylic attached | Underlying enhancement failed | Address the overlay instead of adding glue |
| Shell releases from intact surface | Upper interface failed | Return to compatible surface prep/application |
| Persistent pressure despite correct width | Rigid curve mismatch | Stop forcing and change profile |
A controlled test plan
- 1
Inspect the enhancement for lifting, cracks, pain, and discoloration.
- 2
Measure and dry-fit based on current overlay geometry.
- 3
Choose one shell that sits without pressure.
- 4
Use a conservative test application.
- 5
If it fails, identify the exact layer that separated before changing anything.
What not to do
- Using bare-nail size records without rechecking
- Applying over a lifted enhancement
- Filling a large apex void with glue
- Filing through enhancement into natural nail
- Assuming every release occurred at the press-on glue layer
Worked troubleshooting example
Keira normally wore a size-4 index press-on. After a structured gel overlay, the same shell began lifting near the cuticle even though its width looked correct.
A side view showed that the shell contacted the gel apex first and floated near both ends. She switched to a deeper shell that sat neutrally.
On another finger she spotted an existing gel lift and left it uncovered, avoiding the mistake of hiding an underlying enhancement failure under a new press-on.
Field notes
Structured overlays turn many apparently simple width problems into three-dimensional apex problems.
With layered systems, preserve the failed pieces long enough to see whether glue, gel, or acrylic stayed attached to each surface.
Frequently asked questions
Can nail glue bond to acrylic?
It may physically bond, but acrylic is a different substrate from bare nail. Follow compatible product guidance and never cover compromised acrylic.
Why did my size change after a gel overlay?
The overlay can change width, apex, sidewall shape, and transverse curve.
Can extra glue fill the apex gap?
A large structural void means the shell geometry is wrong. Extra adhesive adds thickness without removing stored tension.
Sources checked
Sources below are page-specific. We prioritize manufacturer directions for product-specific steps and use medical or dermatology guidance when a safety question requires it. Always follow the instructions for the exact adhesive or set you own.